
How to Make the Best DIY Edible Arrangements
I remember my first time seeing Edible Arrangements advertisements on TV. I was captivated. You mean to tell me someone made fruit look like flowers?! Eight-year-old me thought that was magic.
High school me was unimpressed. An arrangement costs how much?! It must come with a lot of fruit and be super high-quality, right? Oh. It’s only pineapple, melons, and strawberries? For that cost? No, thank you.
There had to be a cheaper way. I wanted to make one for my mom on Mother's Day, so I set out to do just that- and it was so much better.
Why You Should Make DIY Edible Arrangements
It’s Much Cheaper to Make
This standard bouquet from Edible Arrangements costs $59.99.
And now, here’s a breakdown of the average cost of fruit used (prices sourced from Aldi.com):
Pineapple: $2.45
Strawberries: $2.19
Cantaloupe: $2.75
Honeydew: $3.99 (Aldi’s website didn’t sell, so price sourced from local grocery store)
That’s roughly $11.38 worth of fruit. Add in a bag of chocolate chips for less than $4. Dollar Tree can supply anything else you might need!
More Personalization Options
Your options are limited when you purchase pre-designed items.
Making your own DIY Edible Arrangements puts all the decisions in your hands, which is far less daunting than it sounds.
For example, when I made my mom a fruit bouquet for Mother’s Day back in high school, I included more of her favorite fruits, such as blackberries. I could choose the fruits I wanted to include in her bouquet since I was making it myself. Hand me those blackberries, please!
What You Need to Make Your Own Edible Arrangement
So what exactly do you need? Here's a list of the supplies to make DIY Edible Arrangements:
Fruit
Skewers (preferably wooden, like bamboo skewers)
Knives
Cutting board
Foam (optional)
Vase, pot, or display item of your choice
Chocolate (optional)
Best Fruit for DIY Edible Arrangement
Apples
Bananas- especially good chilled and dipped in chocolate!
Berries- any type, really, though softer ones like raspberries are harder to work with without some accidental squishing.
Cantaloupe
Grapes
Honeydew
Kiwi
Oranges
Pineapple
The sky's the limit. Chocolate-dipped large marshmallows also make an excellent addition,
How to Make an Edible Arrangement
1. Find Inspiration
Before you get started, I recommend searching for ideas on the internet. Look at the listings on the Edible Arrangements website. See what you like, and what you think the recipient of your bouquet would like. Search DIY Edible Arrangements Pinterest. See what types of arrangements others have made. What do they include? How do they display them?
Once you’ve settled on a basic idea of what you want, it’s time to get to work.
2. Wash and Cut the Fruit
Always rinse your fruit before cutting so that debris on the outside layer won’t contaminate the rest.
After washing the fruit, you can start chopping away.
The pineapple was probably the hardest for me, so here’s a quick step-by-step for cutting a pineapple with cookie cutters:
Skin the pineapple first
Cut it into rings/slices
Use cookie cutters on the slices to make shapes!
It’s really easy- and kinda fun once you get the hang of it! It may take some trial and error, so be patient with yourself. The internet has loads of useful resources for cutting a pineapple!
3. Fill a Vase with Foam
This is an optional step, and one I didn’t use when I made my bouquet years ago. If I made another one, I would use foam or maybe glass rocks or something to stabilize the fruit skewers in the vase.
Without the foam, the “flowers” move around, making the fruit less than perfect in appearance. The fruit is also heavy, and without a base to hold it in place, it tries to fall. A small piece of floral foam (which you can buy at any craft store or Dollar Tree) will stabilize your creation and make it look even more professional!
4. Skewer the Fruit
You’ve got your shapes, you've got your vase, and now it’s time to create!
Start to gently skewer your fruit onto the bamboo rods. Be gentle and take your time. If you try to rush, you might break the fruit (speaking from experience here… I rushed it because I was tired and excited).
Once all the fruit is skewered, it’s time to arrange your edible bouquet! You can use scissors to shorten stems to help shape your arrangement. Height levels can help draw eyes to your bouquet’s center.
Different Ways to Cut Fruit for Bouquets
Wedges
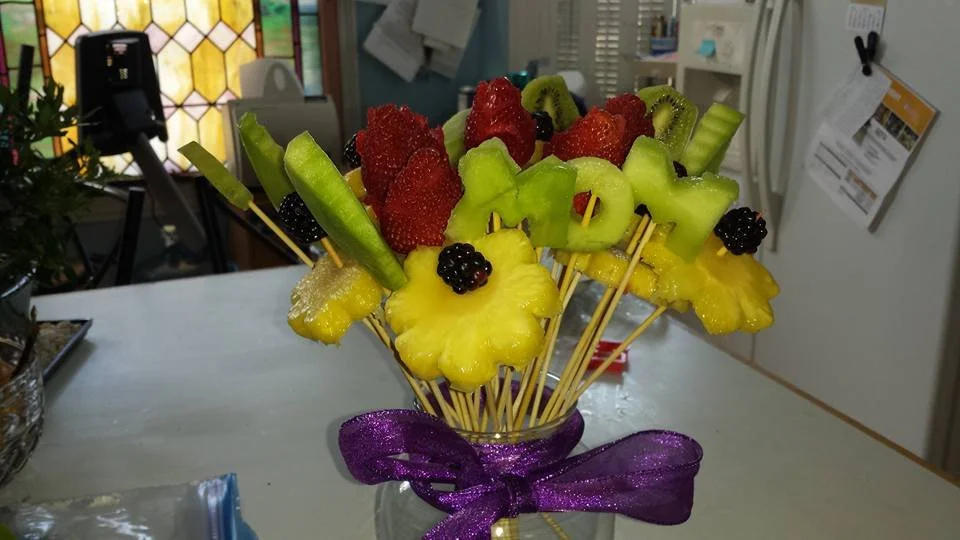
The wedges work best for melons, such as cantaloupe and honeydew. It’s the standard shape Edible Arrangements uses.
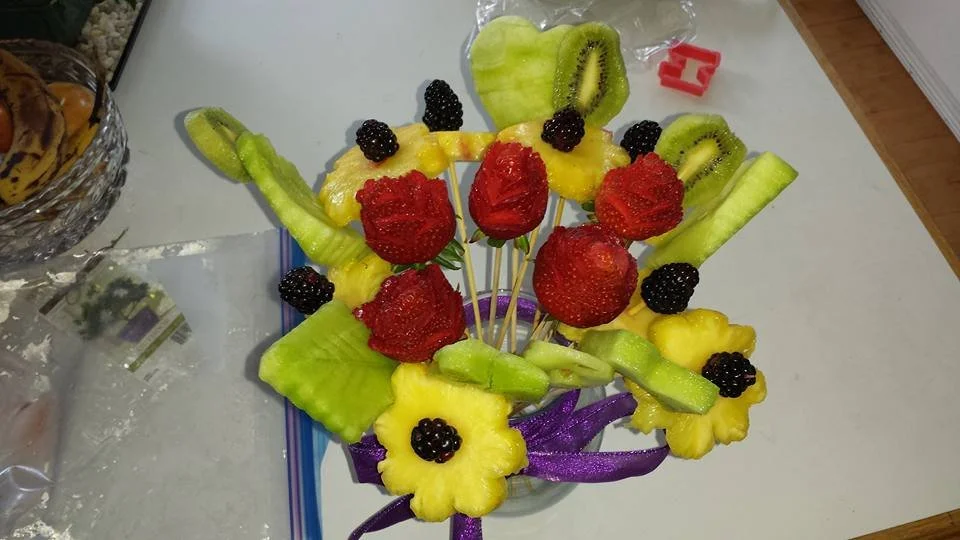
Strawberry Roses
Strawberry roses are not for the faint of heart. Strawberries will look pretty as they are on the end of a skewer, but if you want that little extra razzle dazzle, here’s a step-by-step video from YouTube to make a strawberry look like a rose.
Cookie Cutters
When I made the bouquet pictured in this article, I used cookie cutters I bought from Dollar Tree- back when it was still everything for $1 and not $1.25. I knew I wanted a flower-shaped cookie cutter, and thankfully found one at Dollar Tree in a set with five other shapes.
You can sometimes find some cute cookie cutters at Thrift Stores, but this can be a hit or a miss.
Final Thoughts
Let’s do a full cost analysis on everything you might need to make these bouquets.
Fruit: Total around $12, depending on your choices, availability, and sales
Skewers: $1.25
Foam (or other stabilizer, such as glass pebbles): $1.25
Vase or pot: $1.25 (unless you already have one lying around at home!)
Chocolate chips: $3.25
Cookie cutters: $1.25 (depending on what you can find and what you want)
Total cost of DIY Edible Arrangement: roughly $20.25 (And even cheaper if you already have some of these materials at home!) That’s less than half the price of a small bouquet at Edible Arrangements!
No hate for Edible Arrangements. They’re a pretty cool company, and give out some amazing freebies from time to time. However, if you- like me- are on a budget, and want to do something special for someone, DIY Edible Arrangements are where it is AT! Don’t forget to pair your bouquet with a free Hallmark card!
Let me know in the comments below how it goes for you!